Pages

Saturday, March 15, 2014

BQ#1: Unit P Concepts1 & 4: Law of Sines (AAS, ASA) & Area of an Oblique Triangle


i. Law of Sines:
The Law of Sines is important to use for triangle that are not perfect right triangles, as we have previously dealt with. Instead, the Law of Sines allows us to cut a non-right triangle in order to get two right triangles within it, which we then use to find the height and get the area. The following image shows how the Law of Sines is derived.


iv. Area Formulas:The area of an oblique triangle is derived from the traditional area of a traditional triangle: A=1/2bh. Oblique triangles don't have a definite height because they are non-right triangles as well. The following image shows how it is derived and how the traditional area and the area of an oblique triangle are connected.

Wednesday, March 5, 2014

WPP#12: Unit O Concept 10: Solving Angle of Elevation and Depression Word Problems


Noemi has planted a 10 foot apple tree so that she can use apples in her pastries.
a)Her younger brother Cristobal comes along and stands 15 feet away from the tree. What is the angle of elevation from where he stands?
b)Cristobal, being the younger boy that he is, decides to climb the tree and eats an apple while he's at it. He spots Noemi 27 feet away from the tree and waves down at her from the highest point of the tree. What is the angle of depression?

Tuesday, March 4, 2014

I/D#2: Unit O Concepts 7 & 8: Using the 30-60-90 triangle AND uing the 45-45-90 triangle

INQUIRY ACTIVITY SUMMARY:
This activity basically was for us to figure out on our own why the special right triangles had the patterns that they did. This way, we won't just memorize the patterns but actually understand the patterns through thought process and reasoning.
30-60-90 TRIANGLE:

45-45-90 TRIANGLE:


INQUIRY ACTIVITY REFLECTION:
Something I never noticed before about special right triangles is they are derived from greater parts/shapes. I already knew that when a square or equilateral triangle was cut in half we get triangles, but I never really noticed before that these triangles were derived from it. Even knowing the fundamentals of the shapes they're derived from it important as a sort of background knowledge.
Being able to derive these patterns myself aids in my learning because I will actually be able to understand it instead of just memorizing it and not even knowing why it is the way it is.

Friday, February 21, 2014

I/D #1: Unit N: Concept 7: Unit Circle Derivation


INQUIRY ACTIVITY SUMMARY:

The above image shows the whole unit circle with the first quadrant filled out completely with all three Special Right Triangles. The second quadrant shows the 45 degree triangle as expressed with the x-axis (45 degree reference angle). The third quadrant shows the reference angle of the 30 degree angle triangle. The fourth quadrant shows the reference angle of the 60 degree angle triangle.


The above image shows the 30 degree angle triangle. The side opposite the 30 degrees is labeled as "x", the side adjacent is x radical 3 and the hypotenuse is 2x. These shows the lengths of the sides. I then simplified the three sides of the triangle by dividing everything by the length of the hypotenuse. By drawing the triangle as if it were on a coordinate plane with the origin being represented by the 30 degrees point, I found the vertices of the triangle as ordered pairs. These same ordered pairs are used in the unit circle.


The above image shows the 45 degree angle triangle in a similar position as the 30 degree triangle. This time, the length of the hypotenuse is x radical 2 and both the opposite side and the adjacent side are x because the 45 degree triangle has two 45 degree points. Again, the hypotenuse is divided by every side's length. The triangle is "graphed" in order to find the ordered pairs.


The above image likewise shows the 60 degree angle triangle. This triangle is basically exactly the same as the 30 degree angle triangle except that it is shifted so that when graphed, the origin will be the 60 degree point instead. When the hypotenuse is divided by everything and the ordered pairs are found, they correspond with the 30 degree angle triangle.


The above image shows the first quadrant of the Unit Circle that I drew, complete with the triangles and their angles. As long as I know the fist quadrant, the rest of it should come easily because The rest of the quadrants are basically the same, except for a certain shift. The first quadrant gives me the reference angles, and by knowing the reference angles, I will know the ordered pairs that correspond with each degree and depending on which quadrant the angle I'm looking for is on will make my life easier.


The above image shows the whole entire unit circle filled out with the degrees, radians, and ordered pairs once the triangles are applied to it. This activity helped me derive the Unit Circle because I actually got to understand the Unit Circle. I now see the triangles and the reference angles as pertaining to the x-axis. I get the bigger picture of it all.

INQUIRY ACTIVITY REFLECTION:
1. The coolest thing I learned from this activity was there were special right triangles in the unit circle. When I was introduced to the unit circle last year, all that was required was to simply memorize everything on the circle. I didn't realize there were Special Right Triangles in the unit circle nor that that was why everything was arranged. It was that sort of "aha!" moment for me.
2. This activity will help me in this unit because once I figured out that there were Special Right Triangles in the Unit Circle, I was able to understand why things are the way they are. Now, instead of simply memorizing it, I will be able to know why and how it all connects together.
3. Something I never realized before about special right triangles and the unit circle is how very interconnected they are with each other and that triangles could make up a circle.

Tuesday, February 11, 2014

RWA #1: Parabolas in Real Life

1. Definition:"A set of all points equadistant from a given point (focus) and a given line (directrix)" (Kirch).
Things to Remember: The driectrix and the axis of symmetry have to be perpendicular to each other (both are lines). The distance from the vertex to the focus determines how "skinny" or how "fat" the parabola will end up being. The distance from ANY point on the parabola to straight down to the directrix is always the SAME. The vertex and the the focus are each ordered pairs.
2. Algebraically:
(x-h)^2=(y-k)

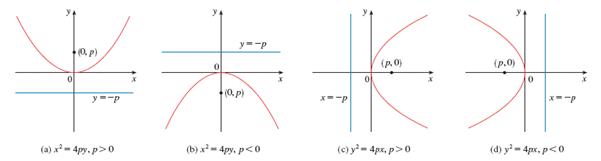
This is just one equation of a parabola. If "x" is the one variable being squared, as this equation shows, then the parabola, once graphed, will face either up or down. "p" equals the distance between the focus point and the directrix, so if "p" is positive, then the parabola will face upwards, whereas if "p" is negative, the parabola will face downwards. (For an example of just what this means, view the image in section 3)
(y-k)^2=(x-h)

This is the other equation for the parabola where instead of "x" being squared, "y" is squared. This means that the parabola will not face up or down but instead face either left or right, depending on"p". If "p" is positive, then the parabola will face the right. If "p" is negative, then the parabola will face the left. (For an example of just what this means, view the image in section 3).
3. This image explains the above concept about where the parabola will face depending on which variable is squared and what "p" is. Instead of straight-out giving us exactly what "p" is, though, we are given the generalization of "p": if "p" is greater than 0, then it will for sure be positive and therefore face either up or right, depending on the one squared term. If "p" is less than 0, then that means that "p" will obviously be negative and therefore face either down or left, depending on the one squared term (http://jwilson.coe.uga.edu/EMAT6680Fa05/Frye/EMAT%206690%20Frye/Conics%20instructional%20unit/Lesson%204_files/image003.jpg).

The following website shows several examples of parabolas in real life, like in roller-coasters and the reflection of a light beam from a flashlight, etc. Mathematics are a basic component of parabolas in roller-coasters, as well as taking into account the force of gravity. The peak of the roller-coaster mentioned in the web-site is the vertex of the ride, which then releases force. Something else this website shows that I haven't yet referenced is how a parabola is expressed in a cone and why it's a conic section. There is even an image which shows a parabola in sliced into a cone and the parabolic trajectory is shown as well (the path of a parabola).
http://mathforum.org/mathimages/index.php/Parabola
This video shows a teacher teaching the concept of parabolas in real-life to her class and where they are found and how math actually does apply to real-life situations. She hit upon the points we have learned so far, but for a more verbal explanation of this concept, please copy/paste this link and watch.
http://www.teachertube.com/viewVideo.php?video_id=554
4.Citing URLS
:
http://jwilson.coe.uga.edu/EMAT6680Fa05/Frye/EMAT%206690%20Frye/Conics%20instructional%20unit/Lesson%204_files/image003.jpg
http://mathforum.org/mathimages/index.php/Parabola
http://www.teachertube.com/viewVideo.php?video_id=554